Sunday, August 29, 2010
We will never forget!!
Peace be with all of you....
Sunday, August 22, 2010
Walmart Wellies!!!

They are just precious the way they are, but who doesn't love making precious even better??? Enter....CRICUT!!!!! (This is where everyone should be applauding wildly!) I dragged out my best crafting buddy, opened up the SCAL (Sure Cuts Alot) software, unrolled the pink vinyl(which looks white in the pics, but trust me, it's bubble gum pink) and bibbidy, bobbidy, boo ......


I think they turned out Plum Precious, which we all know is much better than just Precious!!! She loves them!!! So, everyone run out to Walmart, and grab your pair of $12 Wellies and get crafting...you know you want to!!!


Monday, August 9, 2010
Peanut Shells and Princesses!!
Anywho, my birthday is coming up and we've decided to spend it at the Happiest Place on Earth...you know it...DISNEYWORLD!!!! I, of course, can hardly stand the wait, just the thought of spending the big 4-0 with my favorite characters makes me giddy. Not to mention, I love seeing my kids' faces when they see their favorites, I usually cry!! So, I normally make them a few outfits or something to wear while we are there...I love to have cute pics with coordinating clothes...it's a sickness. But I've decided I'm going no nonsense this time..shorts and tees will be their wardrobe for the Parks. I will be posting pics of the tshirts soon, but I'm having issues finding plain white tshirts that won't kill my pocketbook...I really didn't want to go with a boys undershirt, as they are usually too thin, but they may be what I have to do to keep it affordable. But I've been searching Etsy(also a sickness) and have found the most adorable barrettes ever!!! They have probably been around awhile, as there were quite a few sellers with different variations, but I'd never seen them before and being the copycat that I am, I just had to make them for the girls. Off to Walmart we went and it didn't take but an 1 1/2 to finish all four...can you tell who they are???


I think they turned out pretty good for my first try and both the girls loved them. Butterbean especially loved them. She wore them while she cleaned up the thousand peanut shells she dumped all over the floor!!! I swear I heard her singing "Cinderelly, Cinderelly Night and day it's Cinderelly, make the fire, fix the breakfast, wash the dishes, do the mopping, and the sweeping and the dusting, they always keep her hopping."
DRAMA QUEEN!!!!

Monday, August 2, 2010
All of us learn to write in the second grade...


"All of us learn to write in the second grade. Most of us go on to greater things"....this quote from Bobby Knight cracks me up, but it has me thinking about my own baby who is starting second grade this year. I have one more week of summer vacation before school gets back in session and Sweet Pea will be starting her first day of Second Grade. I look back at the years and how fast they seemed to go by and for some reason this year is worse for me than Kindergarten or first grade. Maybe because it is no longer new to her. She has already had a few years of reading, writing and arithmetic; the homework and daily monotony is no longer fresh and exciting to her; she's been there, done that. I pray that she never becomes jaded and that she never loses her enthusiasm for learning. I hope she can make friends who share her interests and I hope her teachers are a positive influence in her daily life. She's so enthusiastic about school and she loves to learn new things, she's a sponge and is a genuinely compassionate, caring and reflective child. I will hold onto this time and remember it fondly when the inevitable happens...when she will begin to complain and gripe about the fact she has to go to school, when the wonder years begin to fade..it makes me sad to think of her becoming a pessimistic, brooding pre-teen...ugh!!!
I vividly remember second grade...I remember being a blond, freckled face girl who was timid and scared of just about everything. My teacher, Mrs. Jones, was very stern and instilled in us that school was our job...it was the most important thing, as a 7 year old, that we had to do...I remember being very anxious if I didn't do my homework or if I couldn't finish a paper...I remember still wanting to play at home and not being able to have that same feeling of freedom at school. But, I still remember my friends, teachers and Principal at my beloved little Catholic school. I think it is the very first year that I can actually recall with clarity....
My hope for Sweet Pea is that this year be her best...I want this year to start her love of school, friends and learning. I want this year to be the year that sets the precedent for the remainder of her education. I wish for her everything this world has to offer and more.
For all you mothers who have children heading off to school in the next few weeks, I wish you and your children all the joy that comes along with learning new and exciting things. My heart breaks at the thought of my baby growing up, but I marvel at the person she is becoming and I hope that the dream I have for her in the future is surpassed by the one she dreams for herself....and I have faith that she, in the words of Bobby Knight, "will go on to better things"....

Friday, July 23, 2010
Monogrammed Water Bottles


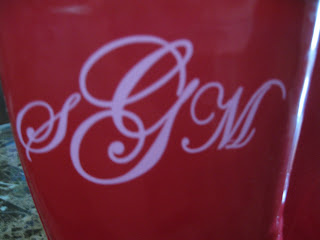
Aren't they great...I purchased the bottles at the Dollar Tree for, you guessed it, a dollar!! And I used my Cricut to cut out the monogram and polka dots...Now, I would have loved to use some precious colored vinyl to complement the bottles a little better, but I got ripped off by a woman on Ebay!!! So she totally ruined my vision, but they turned out cute just the same. I will be ordering more vinyl in a variety of colors again soon, but I have to get over the fact that now I have to deal with thieves on Ebay, and if you are reading this lady, PPFFFFFTTTTT!!!!!!....anyway, have a great day and happy blogging!!!
Thursday, July 1, 2010
Happy 4th of July Weekend!!!
For those of you who don't get the Family Fun Magazine or utilize their website, they have some very cute ideas for 4th of July crafts. Here is the modified 4th of July craft that the girls and I did today...
.

I hope everyone has a safe and blessed weekend and remember to keep praying for our beloved Gulf Coast. As of today there are waves of oil hitting our beaches and our marine life is dying. We could use everyone's prayers. Have a great weekend and keep on crafting....
Thursday, June 3, 2010
I'm still standing!!
First off... have I told you all how much I adore my Cricut...I truly think it is the most fabulous addition to the crafting world EVER!!!
I have a friend who told me we need to start a "Cricut & cocktails" night....how much fun does that sound??? Well, I guess it sounds like fun to me...others may just enjoy the cocktails part, but I know it would be great to see what a bunch of tipsy ladies could create. Anyway, that may be something I look into at a later date but for now I'll just let everyone think I'm a super duper crafting momma with incredible talent...shhhh...nobody tell!!!
So, I've been making the window decals for cars lately..I had some extra vinyl and wanted to use it up..I hate to waste things, especially vinyl, as I practically have to sell my body to pay for the stuff...but here a few I made for my friend Denise.


If you didn't figure it out...she has a gymnast and swimmer in her family....I did do one for myself...with the stick figures and it is sitting very proudly on the back window of my Suburban...however, it is so crooked, I'm embarrassed to post it...
In addition to the stickers, I've been working on tshirts...and I have to tell you..I love, love them. Another friend of mine has been ordering these transfers from a lady. I was going to have her order me a few, but I just knew that I could make them myself. I decided that I would look around the internet and see if I could find a tutorial or instructions of a way to do it. Well, it wasn't an easy process, but I found two different ways of doing it...there apparently is the freezer paper method...you cut out a template with your Cricut and freezer paper...iron it on a tshirt and start painting in...or you can Photoshop a tshirt transfer on iron-on transfer paper...I will say that the Photoshop method is super simple and it will be the way I go from here on out...but I did try the freezer paper method as well..here are the results:
Photshop Method:


Here is the stenciled freezer paper method:


So what do you think? Which method do you like? I am going to make more of the Photoshop version for my girls (I can't take away my friends business..but Amy..if you're reading this, I'll be happy to be your supplier now..hint, hint)...and if you decide that you would like some great clip art to use on your own tshirts...check out mygrafico for some really great images...also....if you use a transfer paper from Walmart...ummm...they forget to tell you to use a piece of wax paper on top of your decal...in addition to a cotton press fabric....please don't forget this step, you will waste your printer ink and transfer paper like some other goofball (which will remain nameless) did!!! And on a side note...I have yet to launder either one of these...I'll update you all when I do...that may be the kicker of which is the most user friendly. OK, DO NOT WASTE YOUR TIME WITH THE TRANSFERS FROM WALMART OR MICHAELS...THEY WASH UP TERRIBLY AND ARE A WASTE OF TIME AND MONEY. I HAVE PURCHASED SOME NEW SOFTER TRANSFERS FROM DHARMA TRADING AND PRESSED THEM YESTERDAY. I WILL BE LAUNDERING AND LET YOU KNOW THE RESULTS OF THESE. I HATE WHEN SOMETHING I LOVE SO MUCH TURNS OUT TO BE A DISASTER BECAUSE OF SUBPAR MATERIAL. So I finally found some transfers that don't fade or tear after washing...they can be purchased at Dharma Trading and are a soft transfer. I have washed my girls shirts a few times and they are fine, I'll check in soon...please leave your feedback on the tshirts...
Wednesday, May 12, 2010
I got my swim trunks and my FLIPPIE FLOPPIES!!!
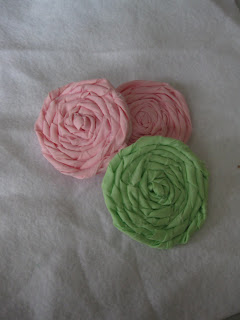 but they worked for what I was trying to achieve. So then, I decided I would modify her idea a bit. I have two girls, so when I see something that I can utilize in their wardrobe...I always try to figure out a way to use it to my advantage. What I decided to do, was make them interchangeable (I wish Blogger had sound effects...I would definitely have added a lightening bolt sound at this sentence).
I glued felt to the back of my rosettes (which you will notice I didn't do in my picture...I figured out later that I would have to or when they pulled it off the rosette would get tugged on and possibly fall apart...the green one has it's own piece of felt on the back). Then I hot glued velcro dots to the back of them....I then cut an identical piece of felt and added the opposite side of the velcro to the plain piece of felt...(to make this easier..I attached the velcro to itself than added glue and placed the plain piece of felt on top...that way it all lined up).

I then had a rosette with velcro and a plain piece with velcro that can be easily slipped under the shoe and changed out with different color rosettes as needed....


Both my girls wore a pair to school today...

these are perfect for summer and I can't wait to start making rosettes in every color....did I mention I love Amanda at Imperfectly Beautiful...I think I'm going to start a fan club for this woman...she is a genius...
Friday, May 7, 2010
Mother's Day Silhouette's with Cricut
Hello blogger buddies...I've been working really hard on Mother's Day gifts and honestly I just about gave up and bought them all a bunch of color your own pillowcases...(there was a sale at Michael's)....I have been so frustrated that I just about lost my ever-lovin' mind!! So...I don't know if you want to try it, or if you want to go the traditional route...which I feel certain would be so much simpler, but here are the instructions on how to make a silhouette with your Cricut...You will need SCAL, Inkscape (free program), and Photoshop Elements (there is a 30 day free trial for this program) for this project.
First off...I took some mugshots of my doodles...I stood them up against a light background, which believe it or not was very difficult to find in my house, as all the walls are painted in colors. Now...go to Positively Splendid for the tutorial on how to black out the silhouettes with Photo Express...She gives a fantastic tutorial on how to use PE and make these silhouettes...
Once you have finished these, use your Inkscape to convert them into a .SVG file...open Inkscape...import your photo which you saved from PE, make sure you scale it into the rectangular box....open Path...choose Trace Bitmap....then hit ok when the Bitmap box pops up....right click you image and drag the new image to the side...then click on original image and delete it....when you have deleted the original image...drag you new image and back into the rectangle...save to desktop...
Now, there is a tutorial out there that shows you pictures and step by step photos of how to use Inkscape..however, I didn't have them bookmarked...but I feel pretty certain I got it from YouTube.
You are now ready to open SCAL and import the new .svg file....once imported, scale it to the size you need. I used vinyl in my Cricut, but you could use cardstock or whatever you want to make your silhouettes. Hit cut on your SCAL....That's it...yeah right...easier said than done...but I explained it the best I could....
It truly was not an easy project, but now that I have the hang of the PE...I think I will be able to do it a little easier next time...Again, there are plenty of videos on the internet showing you step by step photos of how to use SCAL.
Now, I found some great frames at Dollar Tree...

this was my first visit to this store...who knew they had such great bargains? I assure you ...it won't be the last time I visit...The frames had a decent design but really needed a good coat of spray paint. I took the backs off, well, honestly, they were falling off the back already...the glue was coming undone, I don't know what I expected for $1....but anyway, I removed them and gave them a good coat of Krylon.

Once they were dry, I glued the backs on with E-6000 and put them all back together...

I cut out a piece of cardstock to fit inside the frames and placed the vinyl cutout in the center.

I think they turned out great...and hopefully all the "Mom's" will love them. If effort counts, I should get some big daughter points..


I know the tutorial is relatively useless, but I wanted to get this up before Mother's Day in case any of you wanted to try it...if you have questions or you don't understand my ramblings, I will do my best to help walk you through it...just comment. I have seen this done with tracing paper and black constuction paper...that seems simple enough, but I LOVE MY CRICUT and I'm always looking for new ways to utilize it...I hope all the Mom's out there have a wonderful and blessed Mother's Day. I know my favorite gift are the children that have come into my life and changed me for the better. Happy Mother's Day!!!
Thursday, May 6, 2010
Teacher's Gifts...Super easy!!!
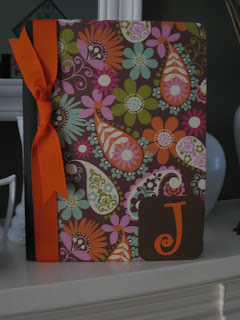
So here are my completed teacher gifts...Here are the supplies you will need: First and foremost, click on the link above (for the tutorial); a composition book (.94 at Walmart)

and some decorative paper and/or card stock, and ribbon, . Now, I used Zig two -way glue on mine..only because I didn't have any double stick tape...but I'm sure either would be fine...plus, I'm really bad at lining up my paper, so I needed something I could reposition. Anyway, I really think they turned out great and I hope the teachers enjoy them. My friend Denise is a teacher and she has always said that as much as she appreciates all the gifts that her students bring her for different holidays and end of year...there are only so many places to put decorative candles and only so many body parts she can wash with bath products...however, nobody will ever say that she smells bad!!!!



On a side note: you will notice on Amanda's blog that she has a tutorial on how to make a decorative clipboard. Well, I tried it and it was a nightmare...um...when she tells you to use spray adhesive, USE IT!!! Don't try to use something else...I used it for the initial paper on the bottom, but when I had to reposition the paper it sorta got rippled. So I thought, I'm just gonna use a two-way glue for the top piece...it seemed to be ok, until I Modge Podged...then it bubbled up everywhere!! Oh well, I will definitely try it again, but next time I'm gonna follow the directions to a T...sorry Amanda for screwing it up, you are the Master...I'm your humble servant!! Happy blogging!!!
